Yeah, I just bought a Lionel Challenger smokebox door as it was hinged. Pretty nice casting, but inner door is small like the UP FEF-3's, not Challenger size) but I believe I can use the outer door (ring) and the hinges at the least.
Decades ago I bought a dual smokestack from 3rd Rail to upgrade a USH loco. Still have it, but way more detailed than the USH.
Caboose Projects
-
Rufus T. Firefly

- Posts: 42220
- Joined: Wed May 16, 2007 7:52 am
- Location: To be Determined
Re: Caboose Projects
Norton wrote:...........I have used ferric chloride to get the last traces of solder off brass.
What do you use to clean up and neutralize the ferric chloride?
What doesn’t kill you makes you stronger. It also gives you a lot of unhealthy coping mechanisms, trust issues, and a dark sense of humor.
Re: Caboose Projects
Rufus T. Firefly wrote:Norton wrote:...........I have used ferric chloride to get the last traces of solder off brass.
What do you use to clean up and neutralize the ferric chloride?
Just soap and water. Any discoloration of the brass can be cleaned up a dremel and wire brush.
Pete
Re: Caboose Projects
it sure cleaned up well!

Re: Caboose Projects
All:
Thanks again for the kind words, though I'm not doing anything high-speed or highly skilled really. Just staying simple and taking my time.
A couple thoughts if they might be helpful, though this applies to brass-on-brass or brass-on-steel. Soldering whitemetal is a different kettle of fish.
I really don't sweat whether there is tinned solder showing, since I paint all my stuff. Paint sticks to it just as well as anything else.
I solder as much as possible from the inside.
I make it a practice to tin both pieces, then apply heat to the heavier/bigger piece until the sheen of the solder "shifts". You'll see it once you try this.
If I get sloppy and get a glob on the outside, I use a solder sucker to remove it. It's considered removed once the outside appearance is of tinned parts.
You really can't screw it up. If something goes bad, take it apart, heat each piece and knock it against the bench. The molten solder will flick off leaving a nice tinned piece ready to try again.
If any smoothing needs be done, I use wire-wool starting with #0 and ending with #000. Anything that doesn't smooth using those grades means going back with heat and the solder sucker, and being annoyed at myself for having been sloppy or impatient.
Using solder as filler is a different story, for then I am shaping it starting with sanding wands, then files, then wire-wool.
The whole model gets primed in light grey before paint. Light flat grey is merciless about showing sloppy bits and flaws. If you really want to destroy your self-esteem, photograph the dingus in light flat grey, for photos add yet another level of merciless; just brutally frank.
Thanks again for the kind words, though I'm not doing anything high-speed or highly skilled really. Just staying simple and taking my time.
A couple thoughts if they might be helpful, though this applies to brass-on-brass or brass-on-steel. Soldering whitemetal is a different kettle of fish.
I really don't sweat whether there is tinned solder showing, since I paint all my stuff. Paint sticks to it just as well as anything else.
I solder as much as possible from the inside.
I make it a practice to tin both pieces, then apply heat to the heavier/bigger piece until the sheen of the solder "shifts". You'll see it once you try this.
If I get sloppy and get a glob on the outside, I use a solder sucker to remove it. It's considered removed once the outside appearance is of tinned parts.
You really can't screw it up. If something goes bad, take it apart, heat each piece and knock it against the bench. The molten solder will flick off leaving a nice tinned piece ready to try again.
If any smoothing needs be done, I use wire-wool starting with #0 and ending with #000. Anything that doesn't smooth using those grades means going back with heat and the solder sucker, and being annoyed at myself for having been sloppy or impatient.
Using solder as filler is a different story, for then I am shaping it starting with sanding wands, then files, then wire-wool.
The whole model gets primed in light grey before paint. Light flat grey is merciless about showing sloppy bits and flaws. If you really want to destroy your self-esteem, photograph the dingus in light flat grey, for photos add yet another level of merciless; just brutally frank.
Re: Caboose Projects
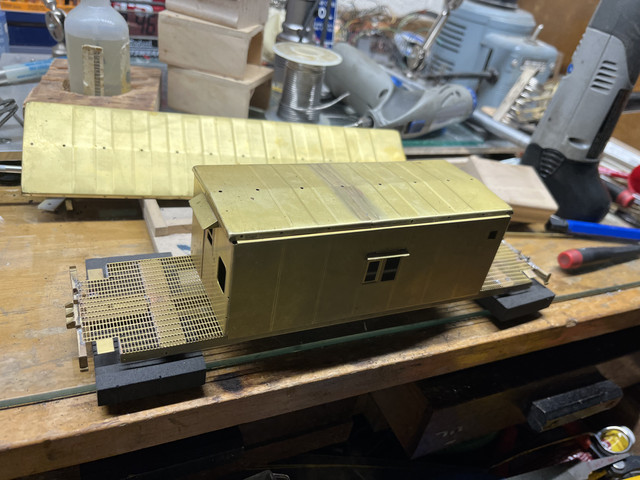
You get to cut and splice the roof from a brass Athearn/All Nation stamping. Here it is cut and spliced, then offered up on the body while it still is bolted to the frame keeping it square.
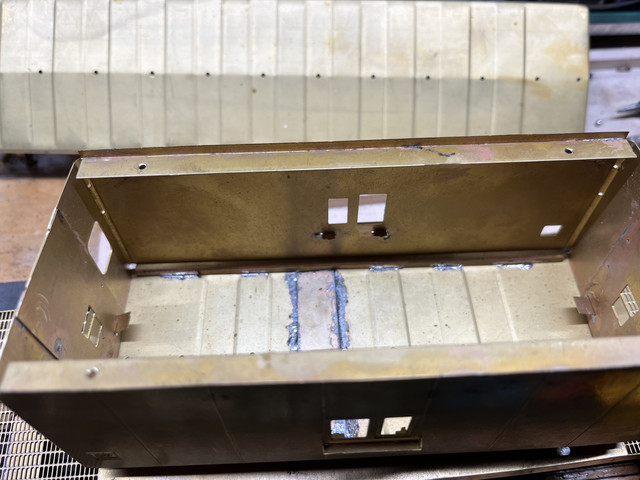
Off with the body and solder it up from inside with fillet joints:
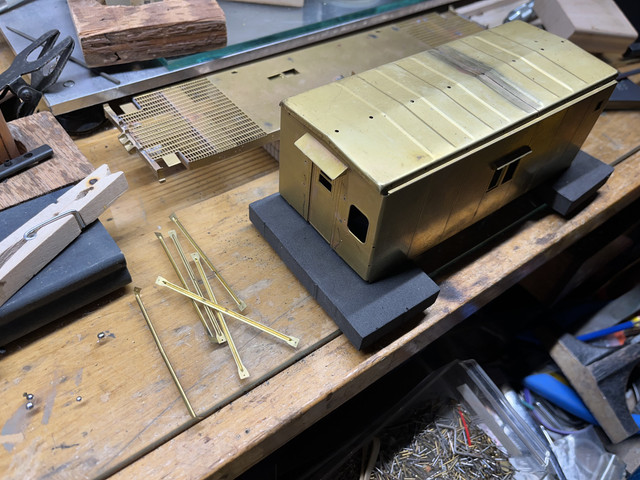
Next up are the roof battens. Being somewhat lazy and an awful cheat, the seam from shortening the roof falls purposely where one of the battens will cover it nicely, saving me the time of filling and finishing with solder.
Off with the body and solder it up from inside with fillet joints:
Next up are the roof battens. Being somewhat lazy and an awful cheat, the seam from shortening the roof falls purposely where one of the battens will cover it nicely, saving me the time of filling and finishing with solder.
-
Rufus T. Firefly
- Posts: 42220
- Joined: Wed May 16, 2007 7:52 am
- Location: To be Determined
Re: Caboose Projects
There's nothing like 90+ degrees outside to foster good progress in the basement workshop!
Looking good!
No, take credit for good planning and thinking in advance!
Looking good!
Being somewhat lazy and an awful cheat, the seam from shortening the roof falls purposely where one of the battens will cover it nicely, saving me the time of filling and finishing with solder.
No, take credit for good planning and thinking in advance!
What doesn’t kill you makes you stronger. It also gives you a lot of unhealthy coping mechanisms, trust issues, and a dark sense of humor.
Re: Caboose Projects
I agree this is a great soldering job. I'm at the beginners stage where I amaze myself with some joints and really disappointed by others, but like you say, you just start over...............as long as you don't apply too much heat and destroy the part. 

Re: Caboose Projects
sarge wrote:They are very relaxing builds and good soldering practice.
Then I should build a bunch of them, as my soldering skills have gone to heck. I recall building a Heathkit stereo amp when I was a kid and now wonder how I ever did it. Of course the fidelity required in building that was far less than a 1/48-scale model. Still, a bit of practice would serve me well.
Re: Caboose Projects
Really helps to have a resistance soldering tools for projects like this. Focuses the heat at the spot you are trying join.
You can build them for a fraction of what the commercial ones cost. Just google resistive soldering tools. Youtube videos as well.
The key is finding a transformer that goes 120 to 4-6 volts, at least 200 watts. Its more about max current than wattage.
Pete
You can build them for a fraction of what the commercial ones cost. Just google resistive soldering tools. Youtube videos as well.
The key is finding a transformer that goes 120 to 4-6 volts, at least 200 watts. Its more about max current than wattage.
Pete
Re: Caboose Projects
I tend to use a range of them, starting with a 100w pencil that I have no compunction about filing off the point and reshaping in an approximate 1/16 chisel tip. Over the years I've found a chisel to be my go-to tip shape, especially for pulling filets and seams on sheet such as this.
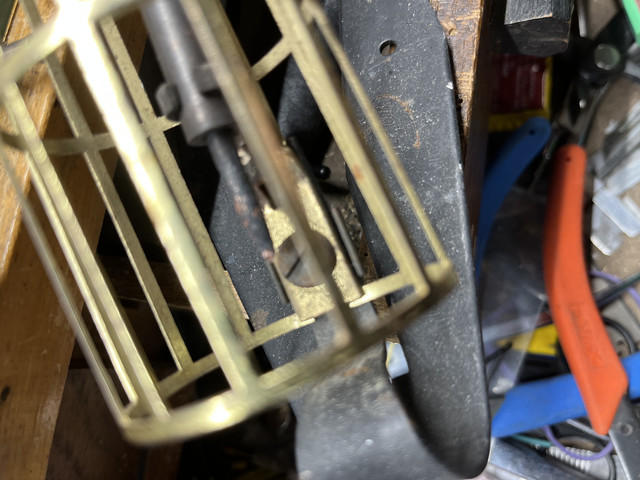
When I need a little more horsepower, then I go to a 300-watt-max resistance rig with a commercial handle bored out for 3/16" copper clad graphite welding rod.
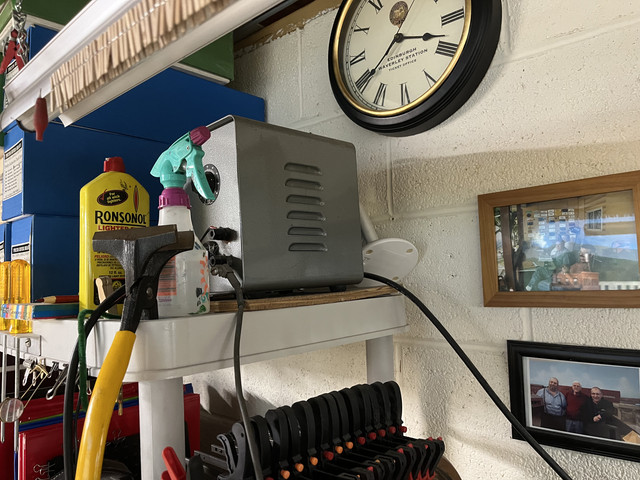
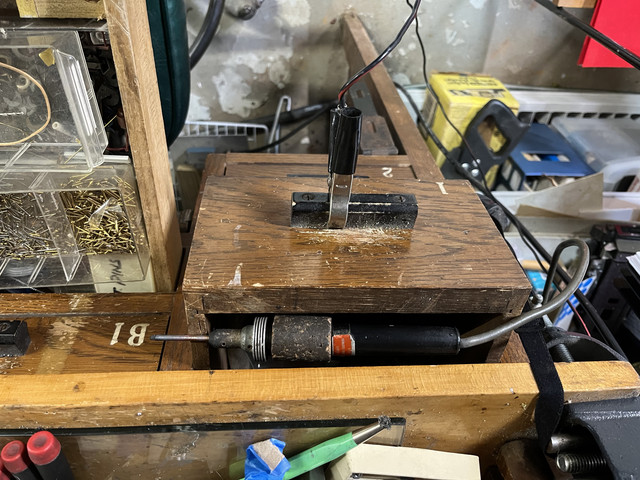
Still, I'm usually using it set to something like 60%. The most useless thing I've tried are those tweezer things; far nicer to go back to the pencil iron rather than fuss with those, especially as they are poorly shaped for seams in general brass-work. Never found anything they are suited for better than an iron.
These first two are what I use most of the time by far. In this project they are the only things I've used; the iron for fillets and for tinning parts to be sweated and the resistance rig to heat the clamped tinned bits to actually do the sweating.
In O scale you easily can overpower even that rig, especially with large castings like diesel noses and such. That's when I fire up this 630-watt-max rig using 5/16" copper clad graphite gouging rod.

It don't end thar!
The jewelry people have these things, great for heavy sweated (lapped) joints. They use these micro torches with MAPP gas for silver soldering, but for our purposes they run well on plumbers' blue-bottle gas and are a lot nicer to handle than a plumbers' torch.
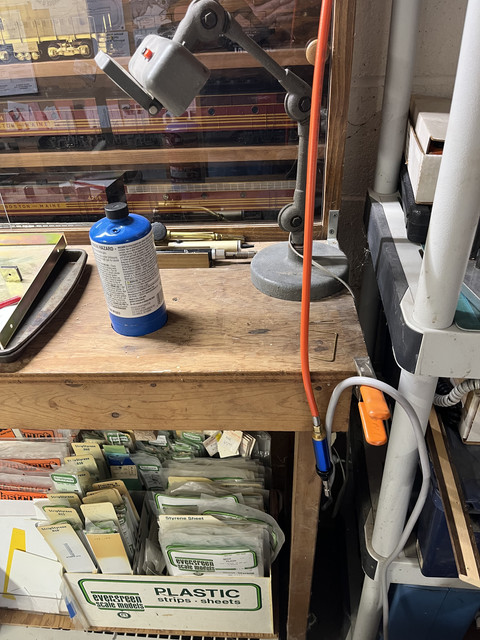
The torch is good for sweating, but filets are still better pulled with a chisel-tip iron. Here is my American Beauty monster. It only pulls 200-watts but that big mother thermal mass trumps just about anything thrown up against it after it has heated up for a half-hour or so. The tip is a new one ready to go into the lathe and get the front inch or so turned down to 1/2" diameter or so, then shaped to a chisel. Seaming with this thing is a joy.
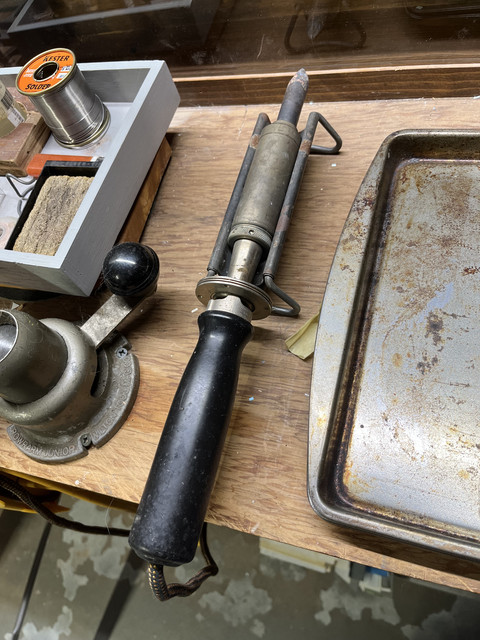
The short of it is different tools and horsepower for different kinds of joints in different thicknesses of material. There is no single soldering tool that does it all, not in my experience.
When I need a little more horsepower, then I go to a 300-watt-max resistance rig with a commercial handle bored out for 3/16" copper clad graphite welding rod.
Still, I'm usually using it set to something like 60%. The most useless thing I've tried are those tweezer things; far nicer to go back to the pencil iron rather than fuss with those, especially as they are poorly shaped for seams in general brass-work. Never found anything they are suited for better than an iron.
These first two are what I use most of the time by far. In this project they are the only things I've used; the iron for fillets and for tinning parts to be sweated and the resistance rig to heat the clamped tinned bits to actually do the sweating.
In O scale you easily can overpower even that rig, especially with large castings like diesel noses and such. That's when I fire up this 630-watt-max rig using 5/16" copper clad graphite gouging rod.
It don't end thar!
The jewelry people have these things, great for heavy sweated (lapped) joints. They use these micro torches with MAPP gas for silver soldering, but for our purposes they run well on plumbers' blue-bottle gas and are a lot nicer to handle than a plumbers' torch.
The torch is good for sweating, but filets are still better pulled with a chisel-tip iron. Here is my American Beauty monster. It only pulls 200-watts but that big mother thermal mass trumps just about anything thrown up against it after it has heated up for a half-hour or so. The tip is a new one ready to go into the lathe and get the front inch or so turned down to 1/2" diameter or so, then shaped to a chisel. Seaming with this thing is a joy.
The short of it is different tools and horsepower for different kinds of joints in different thicknesses of material. There is no single soldering tool that does it all, not in my experience.
Re: Caboose Projects
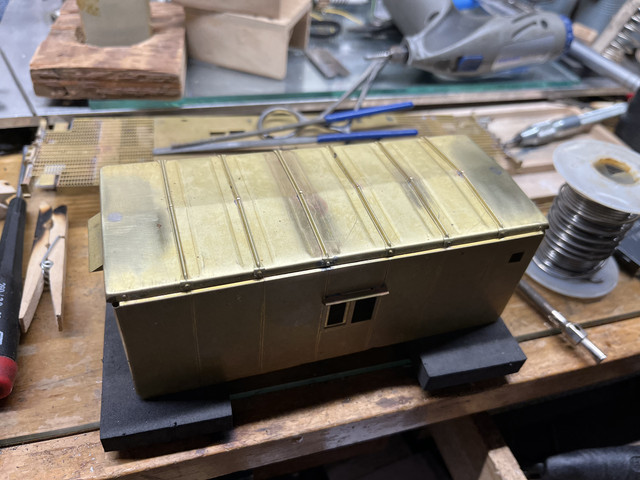
Here is the body done other than the corner grabs.
There are holes in the ends of the roof that aren't used for battens, so filled with solder and finished to make them go away. Other than that, pretty self-explanatory.
Next is to start farming a crop of stanchions and railings.
Re: Caboose Projects
Meanwhile, for those who find working brass perhaps a bit archaeic, an example of what plastic has to offer as a medium.
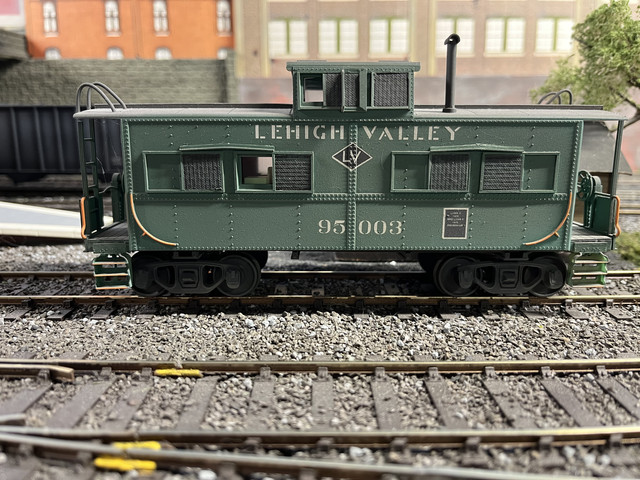
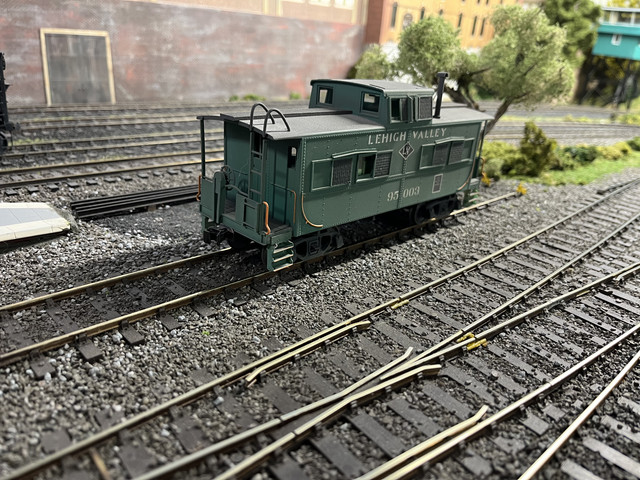
Starting with a Weaver "northeast" caboose, some end windows, ladder hoops, 3d printed LV step-boxes, drip-strips, wind-screens for the cupola windows, stove chimney, the rock screens on the windows are a texture I noticed on the back of some styrene brick-siding sheet.
Trucolor paint, Microscale decals
Starting with a Weaver "northeast" caboose, some end windows, ladder hoops, 3d printed LV step-boxes, drip-strips, wind-screens for the cupola windows, stove chimney, the rock screens on the windows are a texture I noticed on the back of some styrene brick-siding sheet.
Trucolor paint, Microscale decals
-
Rufus T. Firefly
- Posts: 42220
- Joined: Wed May 16, 2007 7:52 am
- Location: To be Determined
Re: Caboose Projects
sarge wrote:......the rock screens on the windows are a texture I noticed on the back of some styrene brick-siding sheet.
Nice detail!
What doesn’t kill you makes you stronger. It also gives you a lot of unhealthy coping mechanisms, trust issues, and a dark sense of humor.
Re: Caboose Projects
I've carefully stashed that piece of brick-sheet in case I need it again.
Airbrushed dark grey, then the green dry-brushed over top to highlight the screen effect.
Airbrushed dark grey, then the green dry-brushed over top to highlight the screen effect.
Return to “O-Gauge, 2-Rail, Model Railroading”
Who is online
Users browsing this forum: No registered users and 46 guests